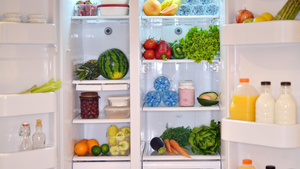
Your refrigerator is the heart of your kitchen, preserving your food and keeping your family nourished. But over time, it can become a breeding ground for spills, stains, and expired items if not properly maintained.
Fear not! With the right approach and a bit of elbow grease, you can transform your fridge into a clean and organized oasis. In this guide, we'll walk you through the steps to achieve refrigerator nirvana, drawing insights from expert advice and practical tips.
Step 1

Preparation is Key Before diving into the cleaning process, it's crucial to prepare adequately. Start by gathering all necessary supplies:
- Mild dish soap
- Warm water
- White vinegar
- Baking soda
- Microfiber cloths or sponge
- Toothbrush (for hard-to-reach areas)
- Empty containers or bins for sorting
- Fresh baking soda or activated charcoal (for odor control)
Once you have everything on hand, unplug your refrigerator to ensure safety while cleaning.
Step 2

Clearing Out the Clutter Empty the contents of your fridge onto a clean surface, sorting items by category (e.g., dairy, produce, condiments). Check expiration dates and dispose of any expired or spoiled items. Take this opportunity to wipe down jars and containers before returning them to the fridge.
Step 3

Remove shelves, drawers, and door bins from the refrigerator, soaking them in a solution of warm water and mild dish soap. Scrub away any stubborn stains with a sponge or brush, using a mixture of baking soda and water for extra cleaning power. Rinse thoroughly and allow to air dry before replacing them in the fridge.
Step 4

With the shelves and drawers removed, it's time to clean the interior walls and surfaces of your fridge. Dip a microfiber cloth or sponge into a solution of equal parts water and white vinegar, wiping down all surfaces to remove grease, grime, and bacteria. Pay special attention to seals and crevices where spills may accumulate.
Step 5

Persistent odors can linger in your refrigerator, even after cleaning. Combat them by placing an open box of baking soda or activated charcoal on a shelf to absorb odors. For a natural fragrance boost, add a few drops of essential oil to a cotton ball and place it in the fridge.
Step 6

Now that your fridge is sparkling clean, it's time to organize it for maximum efficiency. Designate specific areas for different food categories, grouping similar items together for easy access. Use clear bins or storage containers to corral loose items and prevent clutter.
Step 7

Maintenance is Key Maintaining a clean and organized refrigerator requires ongoing effort. Make it a habit to regularly check for expired items, wipe down spills as soon as they occur, and deep clean your fridge at least once a month. By staying proactive, you can keep your fridge in tip-top shape for years to come.
Conclusion
A clean and organized refrigerator not only enhances the aesthetic appeal of your kitchen but also promotes food safety and efficiency. With the step-by-step guide outlined above, you can tackle even the messiest of fridges with confidence. Remember, a little maintenance goes a long way in preserving the heart of your kitchen. So roll up your sleeves, put on your cleaning gloves, and embark on the journey to refrigerator perfection!
And for those looking to upgrade their refrigerator to ensure both style and functionality, we have just the solution for you! Introducing our beverage cooler, the epitome of modern refrigeration technology. Whether you're a wine connoisseur, a craft beer enthusiast, or simply love to keep your beverages perfectly chilled, our beverage cooler offers the ideal storage solution.
With customizable temperature settings, sleek design, and ample storage capacity, our beverage cooler seamlessly integrates into any kitchen or entertainment space. Say goodbye to cluttered shelves and hello to organized luxury with our premium beverage cooler.


